


Extending the Harvest: Peppers & Dill
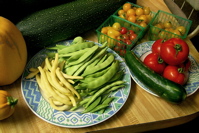
We're back for Weekend Herb Blogging, hosted this week by Pat. These are sweet peppers from early October, including Jimmy Nardello, Super Shepherd Frying, and Hungarian Paprika. I'm drying some for use in soups and stews, but they can also be snipped up into strips, double bagged, and frozen straight from the garden. No blanching or water-dipping, please.

I wasn't doing much blogging during the summer, due to a huge work project, but I do want to mention this tip for next year's garden. I was tired of messing with shade cloth, but didn't want to sun-scald my peppers. So I planted a few zinnias among the peppers, and made sure to snip them so they'd branch out. They shaded the peppers beautifully!  A couple of weeks ago, when I picked all those peppers, I cut out most of the zinnias-- now that sun is a scarcer commodity, they need all the sun they can get! I noticed that a couple of the more productive plants were getting paler green, so I did a side dressing and watered it in. Finally, I put floating row cover over the whole thing, anchoring it to the trellis in back. I have a new crop of peppers ripening now. I may be able to get a 3rd extended crop in early November, if the daytime temps stay in the high 60's, even though we're hitting the low 50's at night.
Last time, we said we'd talk a little about dill. Here's a nice big mound of dill that I processed two or three weeks ago. The key to having nice dill is to snip it dry and put it in the coldest part of the freezer.  If you need to rinse it, fine, but make sure it dries out fully, otherwise you'll have a lot of unwanted ice on it when you are ready to use it. Put it in water when you cut it, just like a flower, to keep it fresh until you can snip it. Otherwise it will wilt and lose quality, as well as being harder to handle.
What I do, as you can see here, is to snip the dill into small leafy sections and set aside the thick stems. I don't shred it entirely, as then it becomes a paste when frozen. I try only to snip little sections off the stems.  It seems like it will take forever, but in fact it's very Zen and goes by quicker than you think. The reward is excellent, fresh dill flavor when there's no fresh dill to be had! I save the stems separately, as they are good to put in soup or a stock where you don't want to strain all those little dill-lets out.
This is the first year I've successfully grown dill from seed. It sprouted long after I'd given up on it, in fact. When I've purchased dill seedlings or pots and planted them in garden beds, they've done well but usually were attacked by aphids before I could harvest them-- or I was letting them go to bloom to attract beneficial insects. I am really liking the quality of dill I got by using young plants under 18 inches tall and basically taking the whole plant. I will try planting some more dill for winter harvest-- the cilantro likes to grow in the fall, and I am hoping the dill will as well. It's always a learning experience!
posted by Strata Chalup @ 9:40 AM
2 comments
![]()
![]()
 After slacking off from gardening and garden postings for most of the summer, working on a big project, I'm back for

