Tuesday, March 29, 2016

Seed Starting Fun

I have a nice older seed-starting rolling stand on the porch, with two deep tray shelves and adjustable fluorescent lights.  It's served me well in the past.  If I could figure out a way to keep two extremely energetic 9-month old kittens out of it, yet still have easy access to tend my seedlings, I would use it!

Having come up with no practical ideas (easy access for me and no access for them) I'm going to use the dryer top and just bring seedlings outside for the day to get sunshine, bring them back in at night, until they are big enough to transplant.  Instead of growing my own eggplants, peppers, and tomatoes this year, I'll buy seedlings of those.  Next year when the kittens are older and hopefully less zany I can see about using the seed-starting stand.

Last night after work I did some garden stuff, filling pots and bringing them inside to start seeds where it's warm. They are on the dryer where the kittens can't get them and where it will periodically be extra warm. I used a plastic tray and plastic containers to make sure I won't get dirt and water on the dryer.


 I have 5 different squashes planted: Georgia Candy Roaster, Italian Ramipicante, Maori Kamo Kamo, Sweet Dumpling, and Sunshine Kabocha.


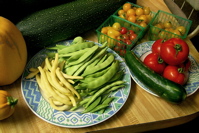
I started a pair of cucumbers, a Beit Alpha and a Renee's Persian cucumber.  I like small, thin-skinned cucumbers that you can eat right off the vine without peeling, yum!


 I also started two six packs of chard, both pretty colors-- the red-n-white stripe stalk Peppermint and the old faithful Bright Lights with red, orange, and yellow stalked versions. Finally I did a pair of six packs of herbs, Vierling blue-green dill and Slow-Bolt cilantro.


 I thought about starting lettuce, but most of my seeds were very old, from 2006 and 2007, so I scattered a bunch outside on my long garden bed and we'll see if I get any volunteers from there. I'll buy fresh seed of the kind I want and plant a six pack or two.

For planting outdoors, a number of years ago I made these Square Foot Garden Guides at TechShop on the Epilog laser cutter.  They're made out of sturdy acrylic, and have the various cultivars that go with each spacing etched on the surface of the planting guide.  


I use the guides for planting, with a chopstick to poke the holes.  Tonight after work I planted 3 squares of yellow wax bush beans, 3 squares of Roma green bush beans, a square of baby bok choi, 2 squares of chiogga beets, and 2 squares of golden beets.  Phew!   BTW, the sun angle is just completely wrong in the picture below, and hides the etched lettering on the guide, wups.


I stopped by OSH tonight and picked up some Forellenschluss heirloom lettuce seed.  OK, Renee's seeds is calling it by the translated name, "speckled trout back" lettuce, but it's the same thing.  I need to poke around some and find Batavian Nevada lettuce-- it naturalizes easily in my yard and I really like the mild taste and frilly green heads.    I'm not sure if I'm going to start the lettuce in 6-packs (I'm running out of dryer space) or just seed in the ground.  Probably the latter.


Sunday, March 27, 2016

Ready, Set, Garden!


The peas I planted a couple of weeks ago are now about 3 inches high, and I'll be working with them to make sure they fasten to the fence and not to each other as they grow.  I added some pansies for color in the bed, and will be starting the squashes for that bed today or tomorrow night.  


My rhubarb crown has sprouted, and the strawberries are happily putting forth new leaves, so I'm a happy camper.  Now that we've got the raised beds finished and are filling them, I can start more of my garden (yay)!


Seedling time!  I loaded up the cart at the Mountain View Summer Winds (pricier than OSH but usually with more of an heirloom selection).  Above are, from the top left, lemon basil, Early Girl tomato, marjoram, Biergarten sage, fernleaf dill, thyme, sweet basil, and two Florence fennels.


Above in this picture are large-leaf basil, Ping Tung Long eggplant, marigolds, curly parsley, and another large-leaf basil.   So I've got most of my herb bed-- missing savory and lemon and lime thymes, and maybe a golden sage if it looks like I have room.  Oh, and "Greek oregano", really Dittany of Crete, a lovely fuzzy plant that tastes like a cross between oregano and sage.  I find that I use marjoram, which is sweeter, where most folks use Italian oregano.   So I don't think I'll be adding oregano to my herb bed.  Here's the herb bed planted out so far:


Next we moved on to the medium 4x8 bed, which will hold tomatoes this year.  I placed the cages just to give the bed some structure and reassure myself that my planting plan will work:


Yep, there's lots of room around the cages for my basil, fennel, carrots, scallions, etc.  I planted out the left side with my Early Girl, my basils, and my fennel.


Then I planted out the right side with my remaining basil.  Today I'll put up the poles and plant my pole beans in the top right corner.   You can see that I need to pick up a couple more large-leaf basil to fill in the gap, or maybe I'll just plant a few carrots there.


This is the most exciting time of the garden year for me-- for some reason this is even more fun than harvesting.  It reminds me of being a little kid and building cities in the mud puddles.  I love laying out the garden plan and planting!

Next week is my birthday, and Mike has been asking "what do you want for your birthday?".  I think I may have found the answer at Summer Winds-- check out the gorgeous metal garden decoration and glass birdbath.  Either of those would make me very happy!  I hope they're still there when we go back today!


Tuesday, March 22, 2016

Garden Plan for 2016

No plan survives contact with reality for very long, but I still love to make my garden plans.  Some things grow, some don't, I fill in the holes, the final garden doesn't always looks a lot like the plan. Usually I do my garden plans up in PowerPoint or Google Slides.  This year I also took advantage of the free square foot garden planner at Gardeners.Com.  I don't necessarily agree with all of their spacing advice-- a square foot for zucchini or tomatoes?!  I filled in multiple squares with those to allocate the space.

One thing I really like to do is add flowers to the garden.  They attract pollinators, add prettiness, and in some cases repel pests.  My favorite flowers to sprinkle into a garden plan are conveniently sold in 6-packs throughout most of the growing season, and usually stay fairly small if planted from a 6-pack instead of from seed:

  • Alyssum
  • Cosmos
  • Calendula
  • Marigold (French, African, or Mexican!)
  • Petunias (avoid spreading petunias like The Wave)
  • Pinks (Dianthus)
  • Violas (Johnny Jump Ups)
  • Zinnia


Without further ado, here are the plans!  I have three main veggie beds, with a small corner fence bed that I didn't need to diagram (two big squashes is all that will fit) and an herb bed ditto.  Next year I'll have to mix these all up, and do crop rotation and all that good stuff, so I'm keeping records of what went where.

The Short Bed: Peppers and Eggplants


I'm returning to my classic favorites, Marconi Red and Marconi Gold peppers, as well as the sweet frying pepper Jimmy Nardello.  I don't have a lot of faith in bell peppers, but I want to try a yellow or orange bell, as I really like them.  For my fifth pepper, I'll choose one of the small upright peppers, like Lipstick or Tulip.  In past years I've grown paprika peppers and mole peppers-- if I see a mole pepper seedling that looks good, I may grow that instead of the Lipstick.

For eggplants, I'm growing mostly the more productive Asian types-- my all-around go-to eggplant, Ping Tung Long, plus the small-but-prolific Fairy Tale with its attractive purple-white variegated fruit.  For that good old fashioned Italian eggplant flavor, I'll grow Rosa Bianca, with softball sized pinkish white round or oval fruit.  The final eggplant will probably be one of the generic "Japanese eggplant" seedlings that appear at OSH every spring.  Worth trying!  Or I'll go up to YamiGami's and find something exotically heirloom to grow in that spot.

It's worth mentioning that the depiction of the short bed is misleading-- it's actually a 4x4 bed, not a 3x3 bed.  The bed it's replacing was a 3x3 bed, and when I grew 9 pepper and eggplant plants in there, they were a bit crowded.  So I'm giving them more room and only growing 9 plants in the short bed instead of the 16 that square foot gardening principles say I could theoretically have. 


The Medium Bed: Tomatoes, Basil, and Small Stuff


I allocate about two square feet for a tomato in a cage, and I prune the foliage to keep them roughly that size.  I make sure to leave plenty of branches and leaves to prevent sunscald on the fruit-- I just pinch off or cut the huge suckers going sideways and heading for the next yard over!

Every year I grow an Early Girl, despite it being an F1 hybrid, and my preference being for open pollinated and heirloom varieties.  It's early, the tomatoes are a handy smaller size, and the particular taste of Early Girl is one of my favorite tomato tastes, not too acidic and very rich.   I have more favorites than I do tomato space, so I have to compromise.  I usually grow some kind of chocolate tomato, and I haven't picked which one this year.  Black Krim has done well for me in the past, but I'll see what's available this year.  I absolutely ADORE the low acid, tropical-note taste of Hawaiian Pineapple, so if I can find it I will grow it.  I have seeds, but I'm not sure if I'm starting from seed this year-- better decide quick, I know.  If I weren't growing a full-size chocolate tomato, I'd grow Chocolate Cherry as my cherry tomato, but instead I'll go with old reliable yummy Sungold.  If I had made room for a fifth tomato, it would be the delicious (also low-acid) Aunt Ruby's German Green.

I'll put in a big patch of generic six-pack basil from the garden store, but will also raise the giant-leaf basil (whose proper name I'm forgetting) and my best buddy Cinnamon Basil.  The giant-leaf basil is super for wrapping around delectables like summer figs or fresh tomatoes, with perhaps a bit of fresh mozarella or some goat cheese inside.  Nom!  

The space between the tomatoes can get a little shady and crowded, so it's kind of a toss-up what will work there.  I'm going to try carrots, companion planting favorite of tomatoes.  One of the classic companion planting books is called Carrots Love Tomatoes, in fact.  In addition to the Nantes carrots, some scallions for salads and kung pao garnish, and for the first time, some fennel.  And what's that in the hopefully-sunny corner? Yes, a few poles and some pole beans, probably a purple variety for appearance and ease of picking.

The Long Bed: Salads and Squashes and Peas, Oh My!


On the side nearest the big fig tree, which might throw some afternoon shade, we have salad-y things that like or at least tolerate some shade.  Kuroda is a nice red carrot I picked up on my visit to the Seed Bank in Petaluma.  I'll sow a square or two of lettuce, and while leaf and head lettuces are depicted in the diagram, I'm still unclear on what lettuces I'm sowing.  Favorites are Cimarron romaine and Forellenschluss leaf lettuce.  I also like some of the "salad bowl" mixes that are to be cut and will grow back.  We'll see!

Dill on the sunny corner, and some chiogga beets and golden beets, a square of baby bok choi, some slow-bolt cilantro scattered around (we'll see if it lasts long enough for salsa making, or if I'll have to freeze it again).  In the back, some cute Peppermint chard, with striped red and white stalks, and my old favorite Bright Lights rainbow chard.  I'm growing peas along a section of the back, with poles and some netting for them to climb, and will put more chard in front of the peas so it keeps going after the peas die back.  I'll also try a Beit Alpha cuke on the netting.  It's supposed to be prolific, so presumably one will keep us happy.  I might try a Mediterranean style cuke next to it, partly in the squash space-- lots of little cukes for eating fresh from the garden.

I've got some Roma beans and some yellow wax beans tucked in there, and might expand them by a square or so on each side.  They might get taken over and shaded by the squashes, but will probably get one or two crops out of them before they're encroached upon.   There are three squashes, and I'm giving them room to sprawl-- ignore the multiple icons and just think of them as squash zones.  

For summer squash, I'm growing this year a Rampicante type long curling Italian squash.  They have a great flavor and are very productive.  On the far side of the garden from it, Kamo Kamo, a Maori heirloom that supposedly can be picked small for summer squash and left to develop for a kabocha-like winter squash.  We'll see!  In the middle, my second attempt at Georgia Candy Roaster, a delicious squash that won first or second place in the Santa Clara County Master Gardeners' taste tests a few years ago (a close second to Sibley).  It's a huge banana type squash, and when I grew it last I got a stunted squash that was barely butternut sized.  This time for sure! 

What are YOU growing this year?!  Send links in your comments!


Tuesday, March 15, 2016

Bare Root Strawberries and a Rhubarb Crown: Mail Order Gardening


The King of Spring Wears a Rhubarb Crown

Funny things happen when you get older, and one of them is you get nostalgic for things.  I was having tea with some of my friends and we started talking about things you can't seem to get anymore (in urban areas) and the talk turned to rhubarb.  We all missed it, and none of us had ever seen it in the Farmers' Market.  Hmm, I thought, why not grow some?

When I visited the Seed Bank in Petaluma, I found rhubarb seeds!  I snagged a packet, and when I got home, did a little research.  Hmm, it takes about 3 years for rhubarb grown from seed to be established enough that you can harvest from it.  But if you get a rhubarb crown, you can harvest rhubarb in two years.

I did a little more research and discovered that rhubarb likes colder winters and less hot summers, and it's usually listed as growing in Zones 4 - 8,  rather than our Bay Area 9's and 10's.   I queried the Master Gardeners of Santa Clara county and found that a number of them were growing rhubarb-- usually the green stemmed "Victoria".  At one point they had done a set of trial plantings of rhubarb, and found that variety, and another green-stem, "Glaskin's Perpetual",  to do best.  However, at least one responder complained that Victoria didn't seem to have that true tart rhubarb flavor (and deep red stalks!) that she remembered and loved.  A variety called "MacDonald", which didn't do as well as "Victoria", had the best flavor and the red color.


Well, I'm all about the flavor, so I started looking for "MacDonald".  I found it at a specialty grower, and was all set to order it, and their website refused to sell it to me once it knew my location in Zone 9.  Sigh.  Too helpful!!   I did a little more research and found that "MacDonald" was developed from "Crimson", so I went looking for "Crimson".   I found it and took the option of ordering the extra large crown which would establish faster-- cut maybe ONE STALK just to prove to yourself it's working in the first year, but you can harvest in the second year on the super crown.

Here's the crown in my gloved hand for scale:


They say it can be hard to tell which end to point up when planting a rhubarb crown, but this one was pretty obvious-- the nub at the top had bright red peeping out of it behind that brownish-yellow fuzz.  Gurney's provided a helpful pamphlet with planting instructions for all sorts of things, including the rhubarb, but I checked the internet just in case.  Everybody agreed, put the bud about 4 inches below the surface of the soil.  Check!


Rhubarb can spread like crazy, and a typical patch can get 3 or 4 feet across.  I didn't want THAT much rhubarb, given I have a small backyard set of raised beds, so I chose to plant my rhubarb crown in a container.  I have some large self-watering planters that I usually grow eggplants in, and decided to dedicate one to rhubarb.   I thought about using the plastic half wine barrel, but thought I might not have enough potting soil to fill it, so I went for the smaller container.  If the rhubarb seems cramped, I can always move it to the half wine barrel in the winter.

(I didn't take a picture of the rhubarb planted, because there's nothing to see but dirt!)

Strawberries in the Mail!

I lost my small planter of everbearing strawberries a few years ago to a watering oops, and have missed them ever since.  I had 8 or so Quinault everbearing plants in a big blue shallow bowl, as you can see below-- enough to get several ripe berries at at time as a gardening reward.   Strawberries can thrive in a container only about 6 inches deep, as long as they are kept well watered.  When I saw bare-root strawberries pop up as I was finishing ordering my rhubarb crown, I couldn't resist.  Impulse buy!  (That never happens to gardeners!)


I knew I wanted everbearing strawberries, not June-bearing-- the latter bear a heavy crop and then stop producing, whereas everbearing strawberries will produce small crops of berries all summer.  I'd rather eat my berries fresh by the small handful than get a quart or two and have to freeze them or make jam.

I was very intrigued by the description of Mara des Bois, a French hybrid that was introduced back in 2011 or so to the States.  "Sugary sweet, bursting with flavor, juicy, red, ... and perfectly shaped" stated a Dave's Garden blogpost, and I was hooked.  I ordered a pack of Gurney's 10 bare-root Mara des Bois, at $16.99.  If I'd looked a little further online, I would have seen Burpee's 25-pack of Mara des Bois for $19.99, but that would have meant two planters and some spares.  Oh well, live and learn!


I'd forgotten how small bare-root strawberry plants are-- I saw this baggie and thought, "where are my plants?!"  And there they are, below, a seeming tangle of dried up plant.  Fortunately, the crowns themselves were still moist and healthy, and the roots really weren't tangled at all-- the plants separated easily once I removed the elastic bundling them together.  Note the green leaves at the crowns of some of the plants!


Instead of a bowl planter that would need frequent hand watering, I chose to put the strawberries in one of my long white planters with a small water reservoir base.  As you can see, there is a layer of screening in the bottom, with about a 2-inch reservoir below it.  This planter will hang on the sunny fence by the BBQ, and have a line of drip irrigation run across it.  The berries will be at eye level, easy to pick and (I hope) safe from marauding snails.


I realize in retrospect that I probably should have spread the roots out as I planted the strawberries.  It was getting dark, and raining, and I knew I wouldn't be able to plant them for several days if I didn't do it tonight (traveling this weekend).   We'll see how they do with their roots mostly going straight down.  The most important thing, which I did remember, is to make sure the crown is above the soil line-- otherwise they will rot.


Now that they are watered, which washed the dirt off the crowns, I can see quite a bit of green there.  I'm eager to see how they do, and will post updates as the plants begin to grow!


Tuesday, March 08, 2016

Garden Season 2016: Raised Bed Adventure

I got busy with a new job in 2014 and didn't update the blog.  In 2015, I didn't keep a garden, because of the dry winter and the drought in general.  This year, we've had a wet winter, and I'm back!

Readers familiar with my garden pictures may remember the black plastic 6-inch raised beds that I've had for years.  They were great when I started, but over time the flaws became unignoreable.  Too many of the sides had gone more horizontal than vertical.  The deep grooves in the inner part of the side made great places for snails to hide.   The spacing of the beds was too narrow for a lawnmower between the beds and the back fence, so we had to use a weed whacker to maintain the grass there.  The black plastic got very hot in the sun, a feature in the spring when the beds warmed up for planting, but less welcome in the summer and early fall.   I didn't keep the beds weeded properly during their fallow period in 2015, and thick mats of grass got established in them.  Ugh.  Time to start over!

First to sketch up what I wanted, based on measurements of the width of a lawnmower (I allowed 26") and the room that we had.  I came up with the following placement:


Good, and now for the beds themselves!  I wanted something that will last the next 12 - 15 years we are likely to be living here, be more structural and upright, and not soak up the sun like black plastic. And be taller-- 12" raised beds will make me happier.   I decided to go with make-them-yourself wooden raised beds, using premade and predrilled aluminum corner kits.  The best combination of expense and functionality that I found were the Gardener's Supply raised bed corners (and the corresponding inline middles).

What to use for wood?  I originally thought of using Trex, but it's super duper expensive.   Many gardeners recommend cedar, due to its rot resistant properties.  That was $1.80 a linear foot, and I would have needed about 438 board feet.  Ouch.  To my surprise, "common" (not heartwood) redwood turned out to be surprisingly affordable.  A woodworker friend says that only the heartwood redwood is really rot-resistant, so we'll have to see how that goes.  Nothing else I've read says that.  So we are going with common redwood.


Ignore the sign in the background saying FREE FREE FREE-- the 2"x4"x10' boards were a little under $10 each.   We used the circular saw to cut the first set of bed sides out, and that was irksome and slow.  We'll take the time to set up our fancy chop box and do a bunch of sides at once next time.  The kits, which included aluminum self-tapping wood screws, were easy to assemble on the cement of our carport.  They were structural enough that we could easily carry the bed to where it would live.


Here is the first bed, a 5'x2', assembled.  I found that I'd neglected to allow for the corner units themselves in calculating the width of the bed, so it is about 3 inches wider than I'd planned.  Wups.  Thus I'll be putting it in the corner by the fence and making a narrower bed for my herbs, here behind the shed.   If you notice the wood doesn't come up fully to the height of the corners, you are right-- they are a true 12" and dimensional 2x4s are really 1.75 x 3.75, so three don't fill the space.


Here is the bed filled with Kellogs Organic Potting Soil, three 3-cubic-foot bags.  I'm leaving room for a top mulch of compost.  I planted peas along the fence (long and short sides), and will get some mesh to staple to the fence for them to climb.  I'm planning on putting a pair of winter squashes in that bed, and ditto on having them climb the mesh.  My husband suggested, alas after the bed was filled, that it would make more sense to put the sharp edges of the posts on the ground, and use the wood-level side on the top.  The next 4 beds will certainly use that method!

I'm busy this coming weekend, Mike is away the following weekend, I guess the last weekend in March will be our mad scramble to finish all the beds to start our growing season.  Though I hope we can work on them in the evenings after work instead, and get some of them going.  I'd like to plant cilantro and lettuces now while it's cooler!